This isn’t something I would typically write about, but I saw someone post on Twitter the other day that they could not afford one hundred and twenty thousand naira for an international passport and I was like… wait, what? Since when did it cost that much? I recently got mine for only seventeen thousand naira.
In light of the fact that the demand for passports in Nigeria has skyrocketed over the past week, I think many will find this information helpful. Please share this article with someone who needs it.
This is not necessarily for everyone though. If you want your passport processed for you and can afford to pay someone for it, then you should outsource it. But if you’re on a budget like me, you should consider running your application online by yourself — It’s called self-application and it’s super easy. You don’t need any technical skills for it or need to pay anyone to process it for you!
Let’s cut to the chase, I got my Nigerian international passport online for only seventeen thousand naira. Here’s a breakdown of how I got it, and how you can get yours. — Step by step, with no step skipped. Let’s go. 🚀
NB: This article only covers guidelines for individuals applying from within Nigeria. (i.e you live in Nigeria.) You can do this on your mobile phone or on a computer.
Step 1: Visit the Nigerian Immigration portal
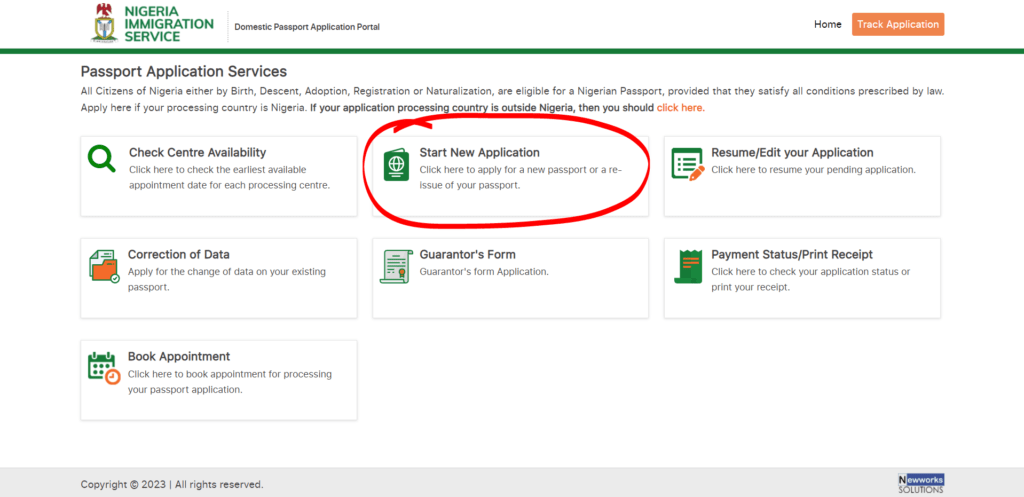
Head over to the Nigerian Immigration portal (passport.immigration.gov.ng) by clicking here and then clicking on “Start New Application”.
Step 2: Fill out the application forms
There are four forms in total that you need to fill out on the portal. I’ll walk you through each of them.
Form 1: Passport Type

- Select the “Applying for Fresh passport” option indicated by the arrow in the image above (Img. 2.1). The process is slightly different if you already have a passport and want to renew it. I’ll provide a follow-up article on that if there’s a demand for it in the comments.
- Under “Passport Type”, select “Standard Passport”
- Choose your:
- Processing state (the state you reside in)
- Booklet type: The 32-page booklet is valid for 5 years and costs less, while the 64-page booklet is valid for 10 years and costs more than the former
- Age group
- Processing office (select the one closest to you)
- Validity (5 or 10 years depending on the booklet type you selected)
- The total fee for your passport will be shown on the right hand of the screen. It is indicated by the red circle in the image above (Img. 2.1). This is the only payment you need to make for your passport aside from bank charges for online payment. [💡 Note that the passport fee differs depending on your location. Because I’m processing mine in Kaduna state, the fee is N17,000. Some states cost up to N25,000 for the 32-page booklet.]
- Check the reCaptcha box at the bottom of the window (indicated by a blue circle) and click on “continue”.
Form 2: Personal Details
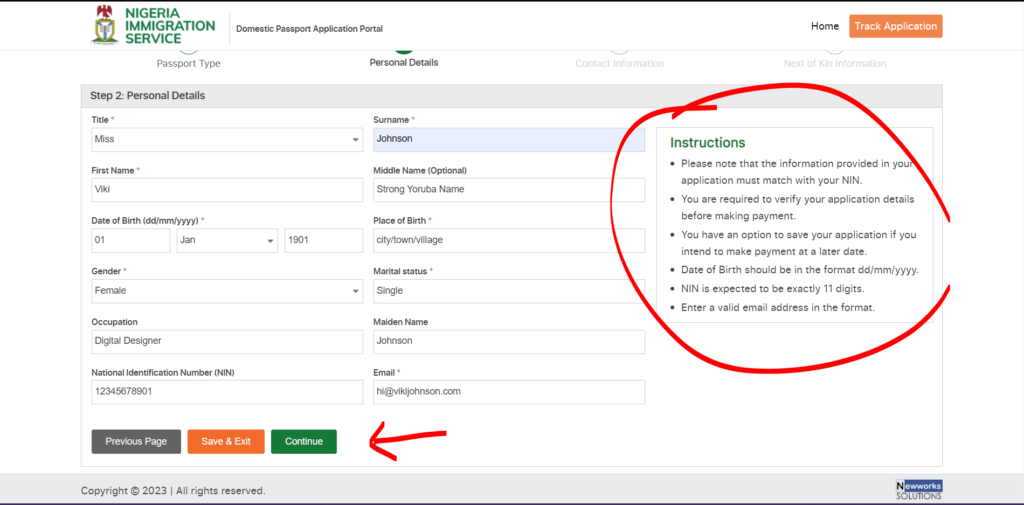
- Fill out the required details in the next form that appears. Ensure you read the instructions on the right-hand side of your screen carefully. The instructions are circled in red in the image below. (Img. 2.2)
- Click “continue”
The details that you provide must match your NIN, so carefully fill out the form and go over it again to make sure your details are correct. You cannot change them after the payment is made. Sope otilo.
Form 3: Contact Information
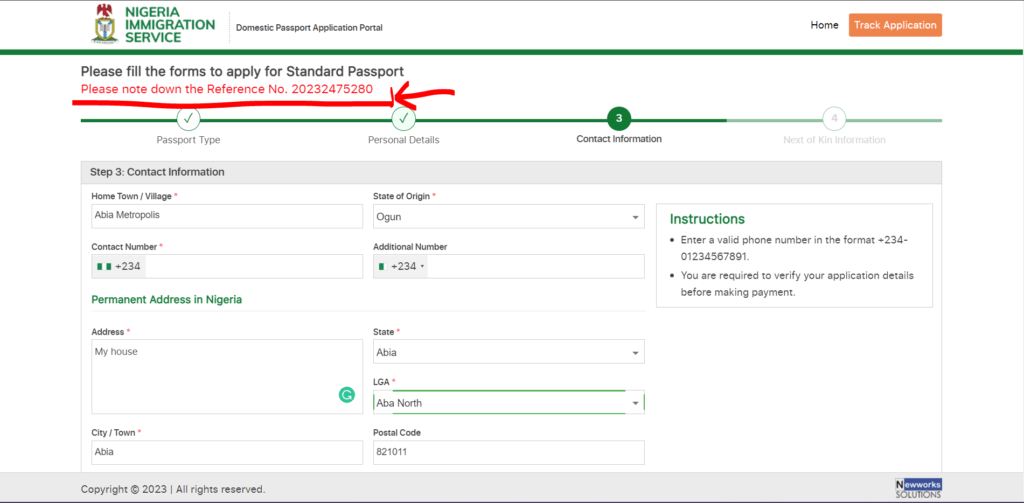
- Very Important: Note down your reference number or take a screenshot of it. Mine is highlighted in the image above. (Img. 2.3)
- Fill in your contact information in the fields provided. — Phone number, hometown/village, and state of origin
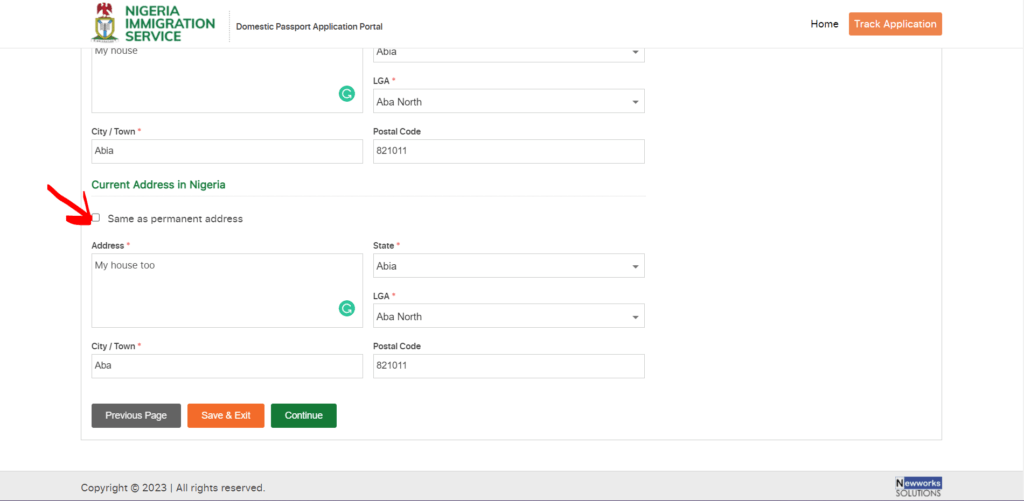
- Fill in your permanent Nigerian address. If your current address isn’t your permanent address, (i.e maybe you school or work in a different state) then enter the address of your family home or your parent’s home. Make sure it’s an address you can still claim 5 years from now (or 10 years from now if you chose the 64-page booklet).
- You can find your postal code via Google. Search “What is the postal code for [INSERT YOUR AREA HERE] on Google. For example, If I live in Banana Island (Amen), I would search “What is the postal code for Banana Island, Ikoyi, Lagos”
- Fill in your current address. If your current address is the same as your permanent address then check the box indicated by a red arrow in the image below. (Img. 2.4)
- Click on “continue”
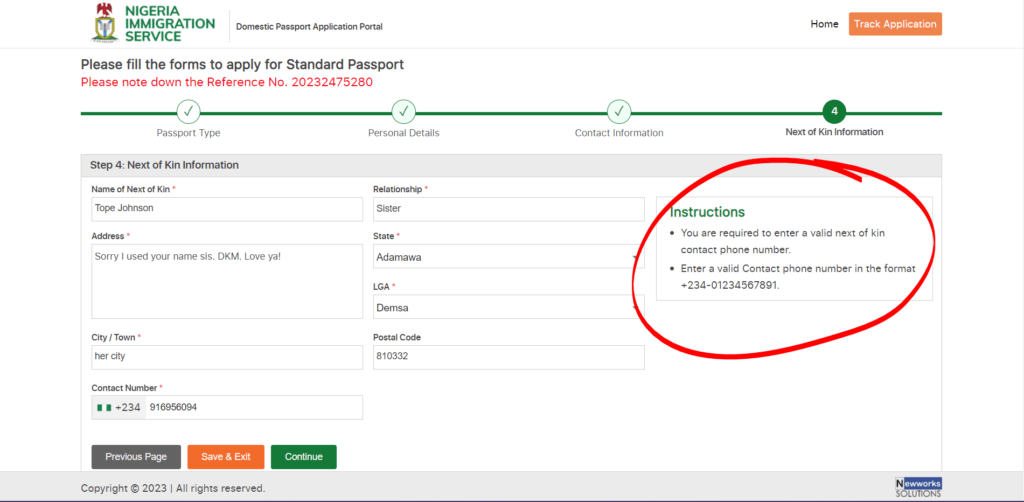
Form 4: Next of Kin Details
- Fill out your next of kin’s details in the next form. Your next of kin is your closest living relative who can be contacted if anything were to happen to you. Again, make sure you read the instructions on the right hand of your screen indicated by a red circle in the image below. (Img. 2.5)
- click on “continue”.
Step 3: Make payment
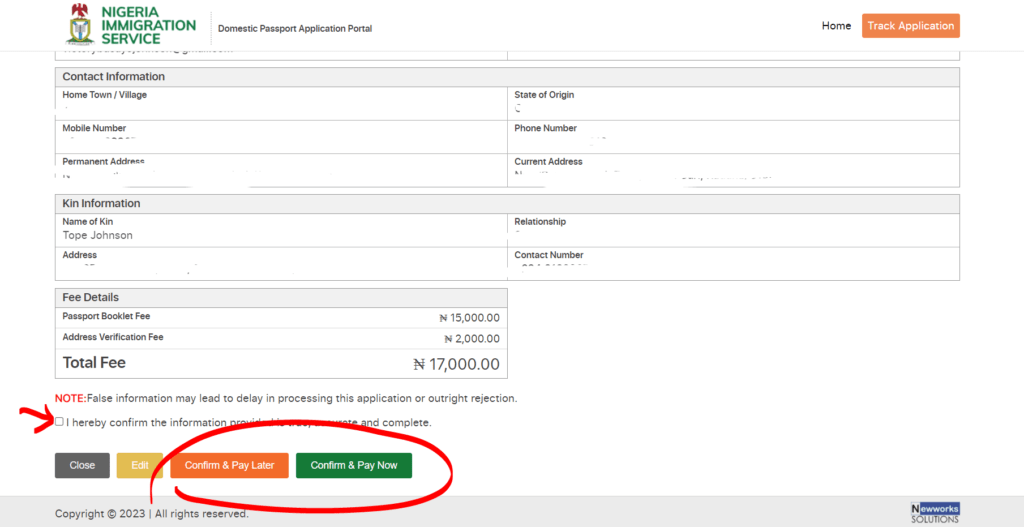
- On the next screen, go over your details in the form provided. Make sure they are all correct, then scroll down to the bottom and check the confirmation checkbox indicated by the red arrow in the image above. (Img. 3.1)
- You can either choose to pay later or pay immediately.
- If you choose to pay later, you will be required to make the payment within 90 days by logging in to your portal using the reference number you noted down earlier, along with your date of birth or email or application number (which is in the form above).
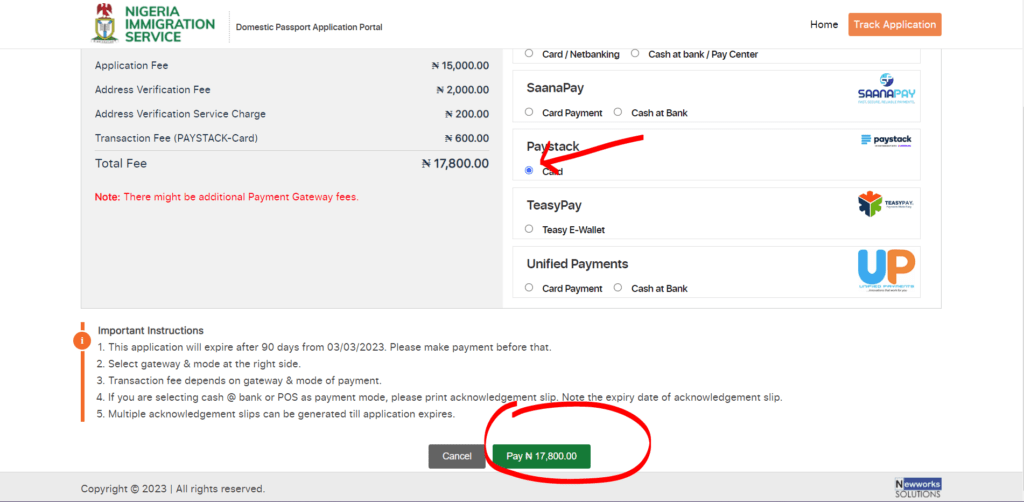
- When you’re ready to pay for your passport — whether now or later, you will be taken to this page shown below where you have multiple payment options. I used Paystack because I trust that they offer smooth payment services and they offer multiple payment options like card payment, USSD, and bank transfer.
- At this point, you should already see your application number just beside your reference number at the top left corner of your screen. Keep a record of this number. See the image below. (Img. 3.2)
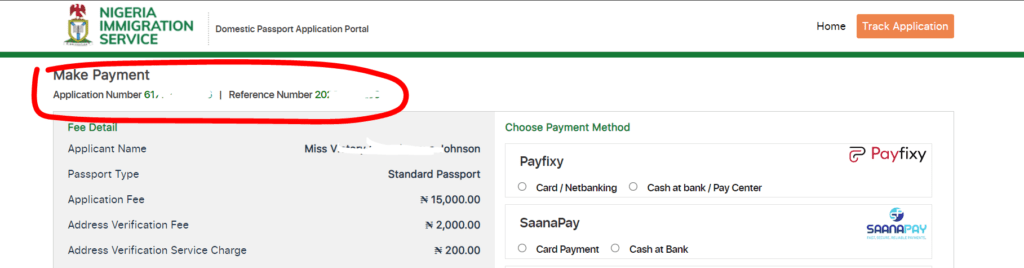
- Click on the green payment button below to continue to payment. The payment process differs based on the option you select but they are all pretty straightforward.
Step 4: Print or Download your application slip and payment receipt
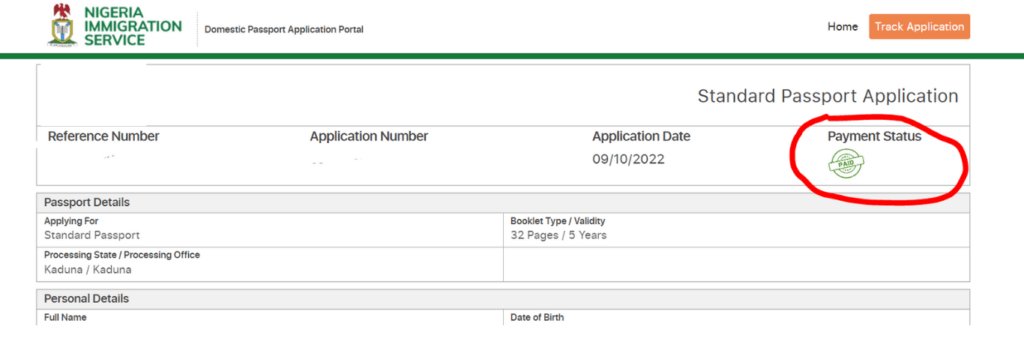
Once your payment is successful, the payment status on your application form will be updated to show a green badge that reads “Paid” as shown in the image below. (Img. 4.1)
You may need to log back into your account on the portal after making the payment. You can do so by clicking here. Use your reference number and application number to log in.
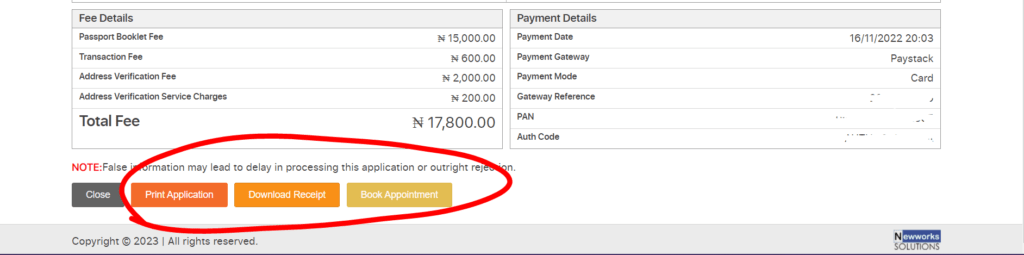
- Once logged in, scroll to the bottom of the page and click on the “Print Application” and “Download Receipt” buttons in the image above (Img. 4.2) one after the other.
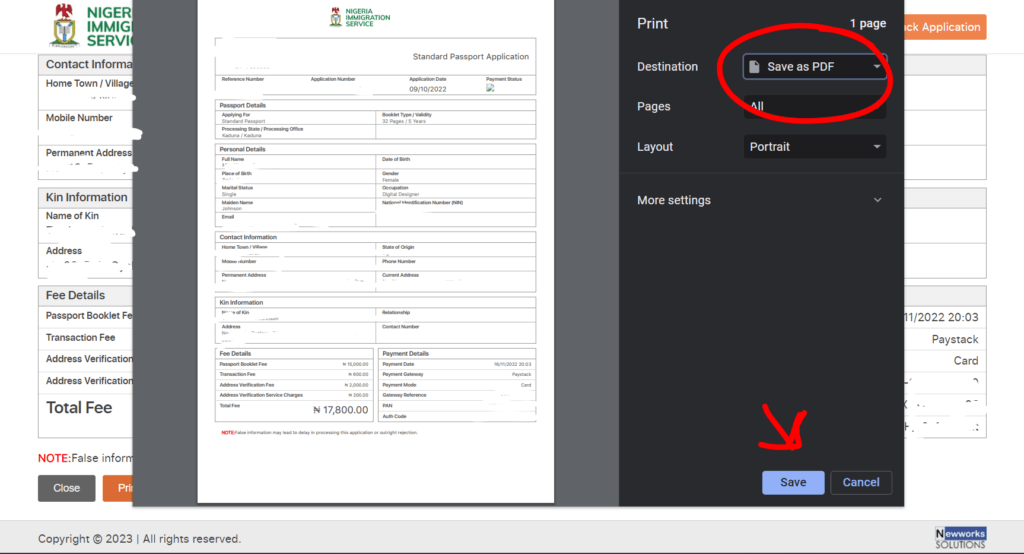
- Click “Print Application” to print your slip. If you do not have access to a printer, you can save it as a PDF on your mobile phone or computer and take it to a business center for printing. The image below (Img. 4.3) shows how you can save the document as a PDF file in your browser.
- Now click on “Download Receipt” to print or save your receipt to your device in the same manner.
Step 5: Book an appointment for capturing
- The next step is to book an appointment for capturing. Click on “Book Appointment” in Img 4.2
- You will be taken to a booking page shown in the image below (Img. 5.1). Select a day and time that’s convenient for you to visit the closest Nigerian Immigration office to you. Dates that have a
strikethroughare not available. - Click on “Next”
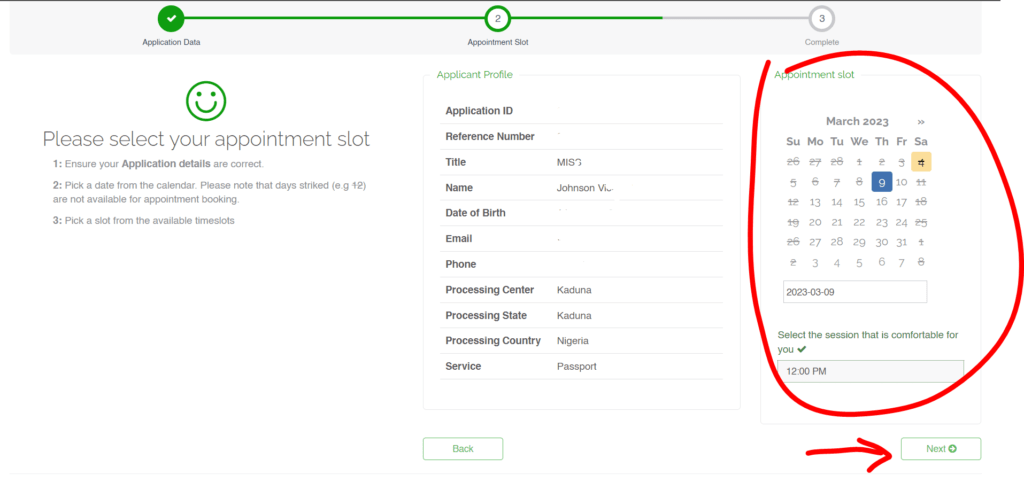
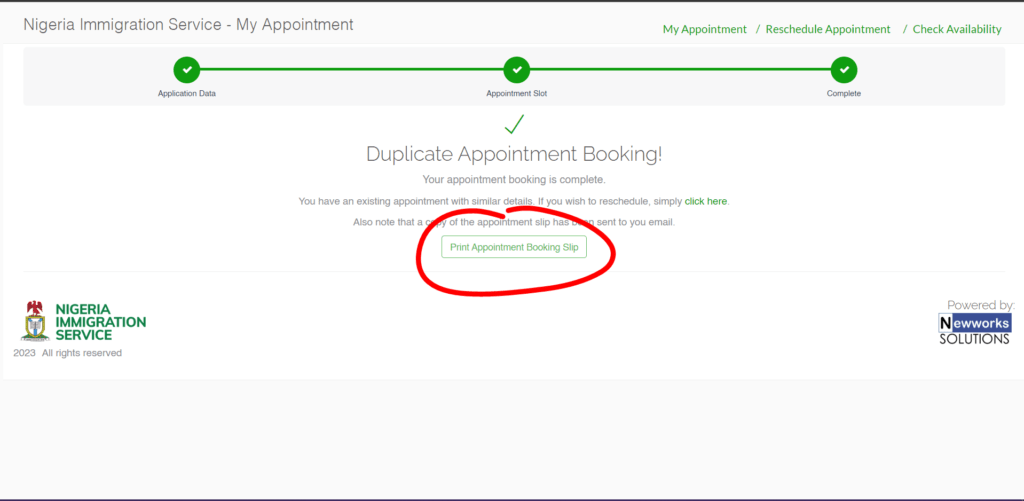
- Now print your appointment slip by clicking on “Print Appointment Booking Slip” on the following page. The button is circled in the image below. (Img. 5.2) You can also save it as a PDF file like the other documents and print it later.
Step 6: Print your guarantor’s form and have it filled and signed
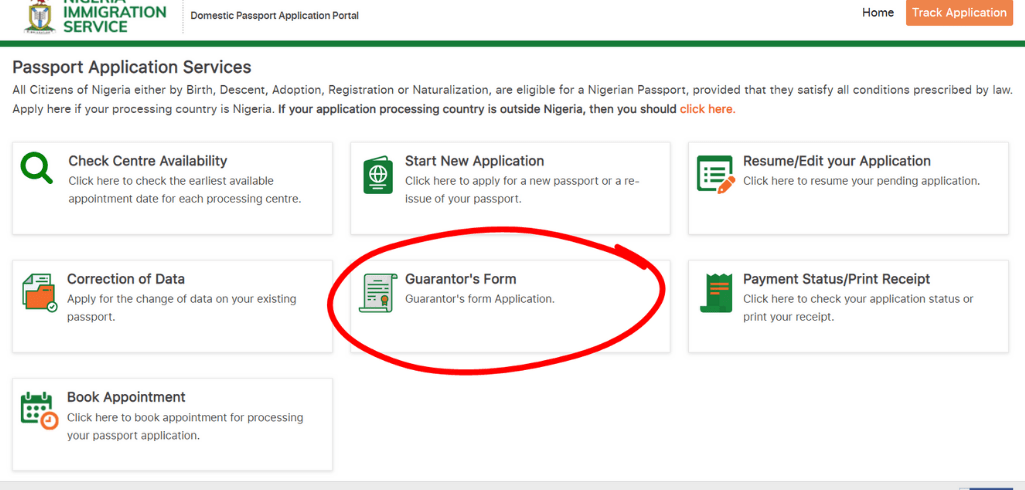
- Go back to passport.immigration.gov.ng and click on “Guarantor’s Form” circled in the image below. (Img. 6.1)
- Log in with your reference number and application number.
- Your guarantor’s form — bearing your name, and other details will appear on a new page.
- Scroll to the bottom of the page and click on “Print” to print it or “Download PDF” if you do not have a printer.
- Print it out and give it to your guarantor to fill out. Ensure that he/she fills the form correctly in BLOCK LETTERS, appends their signature, and thumbprint where required. They can use the document below (Sample of Filled Gurantor-Form) as a guide when filling out this form so they don’t make any mistakes.
- You need a passport photograph of your guarantor (signed at the back) to attach to this form, along with a photocopy of the data page of his/her passport. The data page is the page that carries their details, photograph, and signature on their passport.
- Your guarantor is also required to sign on the back of your passport photographs. You need 2 passport photographs.
Who can be your guarantor?
Anyone who already has a Nigerian International passport and a National ID card can be your guarantor. Find someone who has these two documents and have them fill out the form in the manner shown in the document above. (Sample of Filled Guarantor Form)
- After your guarantor has filled and signed the guarantor’s form, take it to the nearest court to you and have it signed and stamped by the commissioner of Oaths. This does not require any payment though someone at the court might try to request money from you, it’s totally up to you to decide whether to give them some or not.
- You should also use this opportunity to get an age declaration document at the court. You might not need it, but it’s good to have it just in case. I paid a sum of five hundred naira for the document.
Step 7: Get your documents in order
When going for your appointment, make sure you have all the required documents with you. Here’s a list of the required documents:
- A copy of your National Identification Number (NIN) slip. Your national ID card will NOT be accepted in place of this.
- ONE of the following documents (Only one is required):
- Letter of identification from Local Government
- State of origin or residence certificate
- National Identity Card
- Letter of introduction for employees of government as a Nigerian citizen stating Service Number, Length of Service, and Designation/Rank. The letter must be accompanied by a valid staff identity card.
- Your Completed Guarantor’s form duly signed by a Commissioner for Oaths, attached with a photocopy of the data page of the Guarantor’s Nigerian e-Passport and one passport-sized photograph of the Guarantor.
- Completed passport application form (the form you printed in step 4 above)
- 2 passport-sized photographs (your passport photographs are to be signed at the back by your Guarantor).
- Marriage certificate, where applicable. (Only if you are married)
- Birth Certificate issued by the National Population Commission or Age Declaration attached with one passport-sized photograph and duly endorsed by a Commissioner for Oaths. NB: Nigerian Immigration says that you only need one of these documents but some of the officials might decide to reject the one you take along with you in order to extort money from you, so go wit the two. If they tell you that they don’t accept the NPC birth certificate, give them the age declaration document.
- Evidence of Payment. (The receipt you printed/downloaded in step 4 above.)
Step 8: Go early for your appointment
Make sure you are early for your appointment so you don’t get delayed or asked to pay for coming late. 🤷🏾♀️
When you get to the Immigration office on your the day of your appointment, Hand your documents over to the right official and wait for capturing. The process takes only a few minutes. You should be called in for capturing at the time of your appointment but of course, you’ll have to wait for a while. — We’re in Nigeria 🙄
Step 9: Don’t let anyone extort money from you
One very important thing that you should note is that some (most) Immigration officials will try to extort money from you (e dey their blood). You can avoid this by making sure all your documents are available and up to date.
These officials thrive off ignorance and nativity. You are not ignorant about this topic because you have thoroughly read this article. Once you give the impression that you know how the process works, they’ll move on to their next victim and leave you in peace.
Remember to go with ALL the required documents listed above. If possible, make photocopies of each so that they don’t charge you 10k for photocopies. 😂 — I’m serious, if you can’t find anywhere to make photocopies and you have to use their copiers, they will charge you ridiculous amounts. — It’s crazy, but na so we see am. LOL. Stand your ground and don’t give anyone money for anything. The online payment you made on the portal earlier is the ONLY payment required for processing your passport! They might even charge you for sitting down. LOL. Stand. — I’m not joking.
Step 10: Log in to your portal regularly to know when your passport is ready
Typically, you should receive a call when your passport is ready. If you’re savage like me though, you might have said a thing or two to an official during your appointment which might have given them a reason to exclude your name from the list of people to call when their passports are ready. To be safe, just check your portal regularly to know when your passport has been issued.
To check your portal,
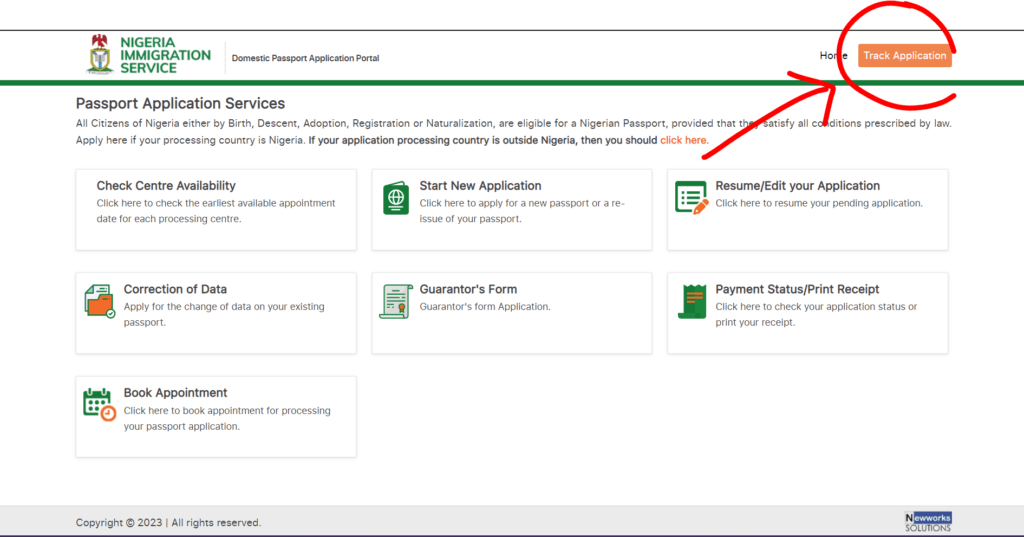
- Visit passport.immigration.gov.ng and click on “Track Application” at the top right corner of the screen circled in the image below). (Img. 10.1)
- Enter your application number and reference number as usual and click on “View Application Status”
- Your application status will read “Passport Issued” once your passport is ready to be collected and you can go over to the Immigration office to get it.
From start to finish, it took about 3 weeks to get my passport in hand. I processed it late last year before the sudden increase in demand for passports so the same timeline might not be guaranteed at this time.
This is note-worthy: People handle passport processing as a business, which is completely fine. Like I said earlier, if you want to outsource your passport processing, you can. Find someone reliable and pay them to process it for you. The method outlined in this article is the same method they will use to process your passport. Be careful who you trust with your personal details though as there have been cases of people’s data being sold to scammers online. Make sure whoever handles your passport processing is a reliable somebody. Found this helpful? Leave a like and a comment and share it with friends.
There’s a tribe of people with whom I share insights on how to use technology to improve daily life and earn money online. I’m talking about the Digital Discourse tribe. Tribe members receive exclusive emails from me every week. You can join the tribe for free by signing up here.
Thank you for this eye opening insights to this topic.
This is amazing! Thank You vee. Tochi
Glad you found it helpful, Tochi! 💜
You’re welcome, daddy! 😁
Well detailed. Weldone!
I find this helpful, kudos
It’s my pleasure Ahmad. Thanks for reading and I hope you drop by again for more valuable content. 🙂
Thanks for this. Pls I need the process for renewing of International passport. Mine has expired.
You’re most welcome. Check back soon for it.
Very helpful. Thank you so much.
You’re most welcome!
Wow, this was really helpful and eye Opening. However, is the process for renewing your passport the same?
It’s slightly different but much more straightforward because you don’t have to provide as much details.
This is amazing. I needed this.
Thank you.
You’re welcome! Glad I could be of help!
Wonderful! Thanks for this info
You’re most welcome!
This was extremely helpful and very detailed. Thank you Viki.
Thank you so much for this insight
Thank you very much ma
This was super helpful